
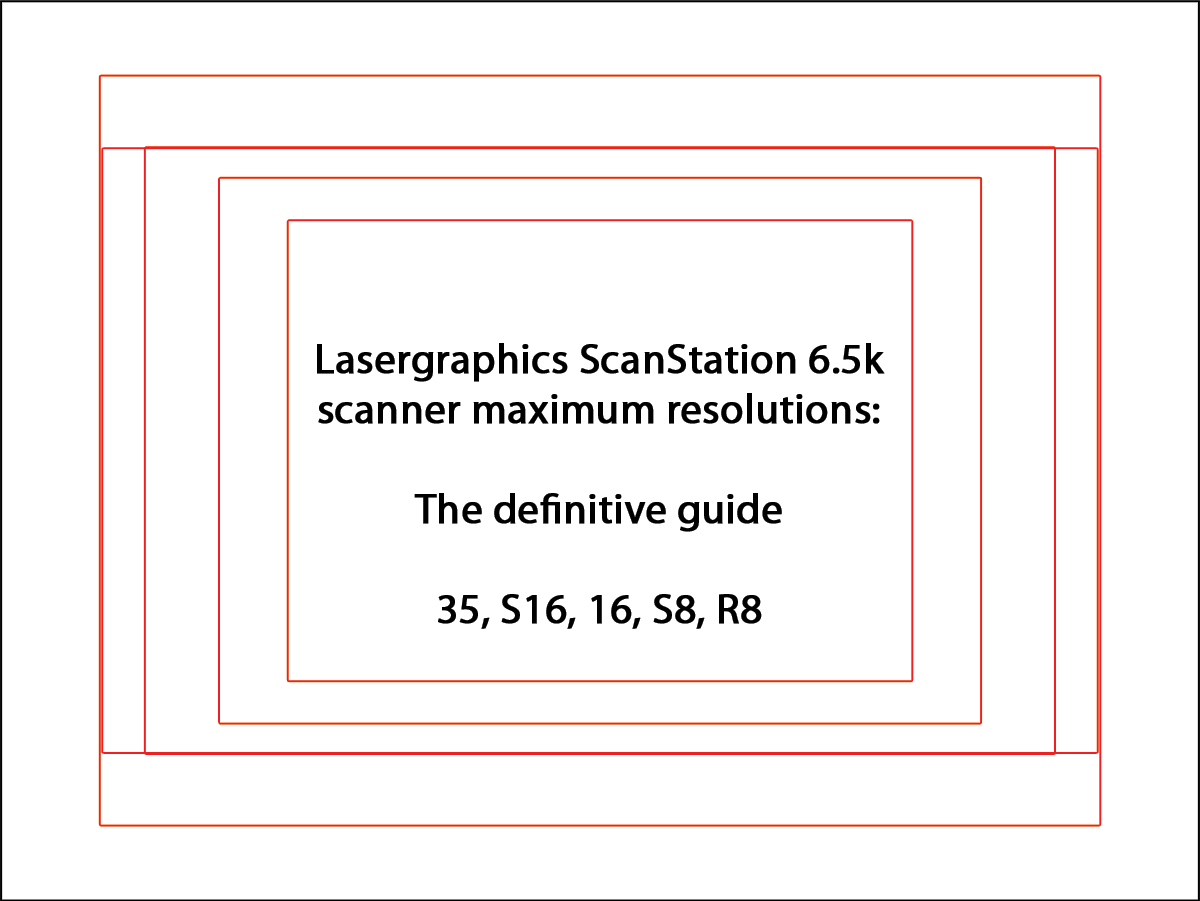
What resolutions do you really get when you scan? If you ask for 6.5k is your film frame 6.5k?
These are excellent questions and the answers (as usual) require a bit of explanation. First, let's dive into how most modern film scanners actually capture the image, including our Lasergraphics ScanStation 6.5k and our Sasquatch 70mm archival scanners.
In its most basic form, a motion picture scanner is just a light source, a transparent image, and a camera/lens combination. The light shines through the image, illuminating it, and a digital camera records that image to disk. In the past, with scanners like the Northlight, Imagica, and many others, the film transport was sprocketed. The sprocket wheels engage with the film to pull it through the machine to the next frame. The area being captured is largely determined by the dimensions of the scanner's physical gate -- the aperture through which the light illuminates the film. This is fine if your film is in good shape. but if it's shrunken, it's not a good idea.
To make the scanner safe for scanning shrunken or damaged film, the camera/lens assembly is pulled away from the gate (where the film is) to reveal the area around it, and the sprocket drive and mechanical registration pins are eliminated. The scanner then uses the image of the perforations to register the frame in the correct location, just as a mechanical registration pin would. As a result, the area occupied by the film frame is reduced relative to the size of the digital image, because the scanner needs to see more than just the film frame. This is what we call overscan: the film frame itself, plus some of the perforations and possibly even some of the surrounding frames.
This allows great flexibility in scanner design, because you don't need to worry about physically registering the film at the time the image is made, and subtle variations in motor speed, shrinkage, etc, can all be accomodated. What does it look like? Well, here's what our Lasergraphics scanner actually "sees" when film is going through the machine:
And here's what it outputs after using machine vision to calculate positions and align the perforations and/or film edges to known locations within the output frame:
As you can see, the film is perfectly steady, but now you see the scanner's gate moving. Why? The film frames are in slightly different positions relative to one another within the the scanner's gate, due to variations in the servo motor speed that drives the film transport, and the flexibility of the transport itself, which is designed to allow curved, warped, or twisted film to safely pass through the machine. When the individual frames are aligned, the edges of the scanner's gate appear to move around -- the opposite of what's happening at the time of scanning. This happens with brand new film as well as shrunken film, and is by design. Even if you order an image that's cropped inside the original film's frame lines, the scanner always sees the film like this before the crop is applied. It has to, in order to capture the perfs necessary to align the frames.
(When we deliver a film with normal overscan, you're not seeing this much, you're seeing the film's frame plus a little more. We can adjust this level of crop to whatever you'd like - just ask us!)
The scanner's camera is set up at the factory so that the edges of the scanner gate more or less matches up with the edges of the resulting digital image. So when you ask for a 6.5k scan, what you're getting is exactly what the scanner sees: the full width of the sensor in that camera. The film frame within that area varies from gauge to gauge, from about 3.3k for Regular 8mm to 5.4k for 35mm film. This is due to the characteristics of each gauge, as well as how close the scanner's camera and lens can be repositioned relative to the film gate.
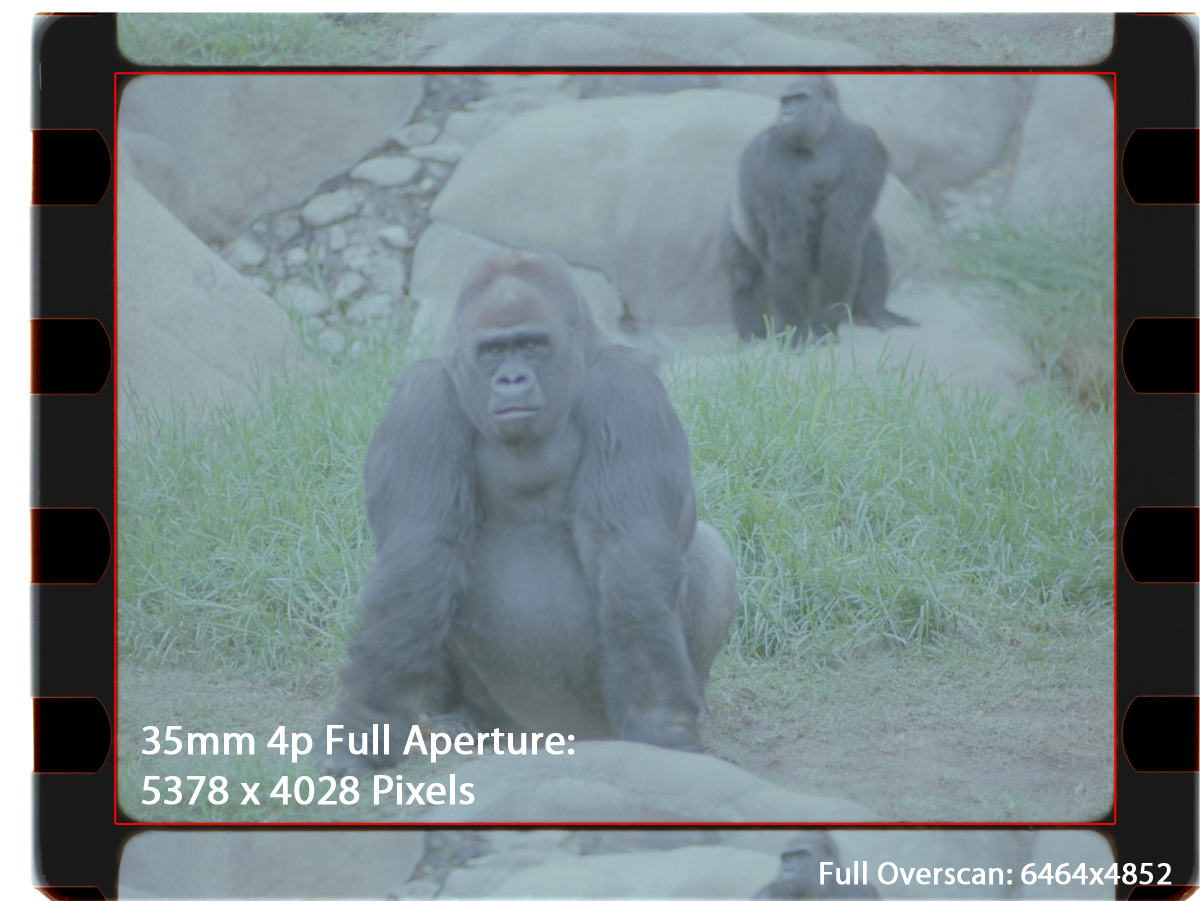
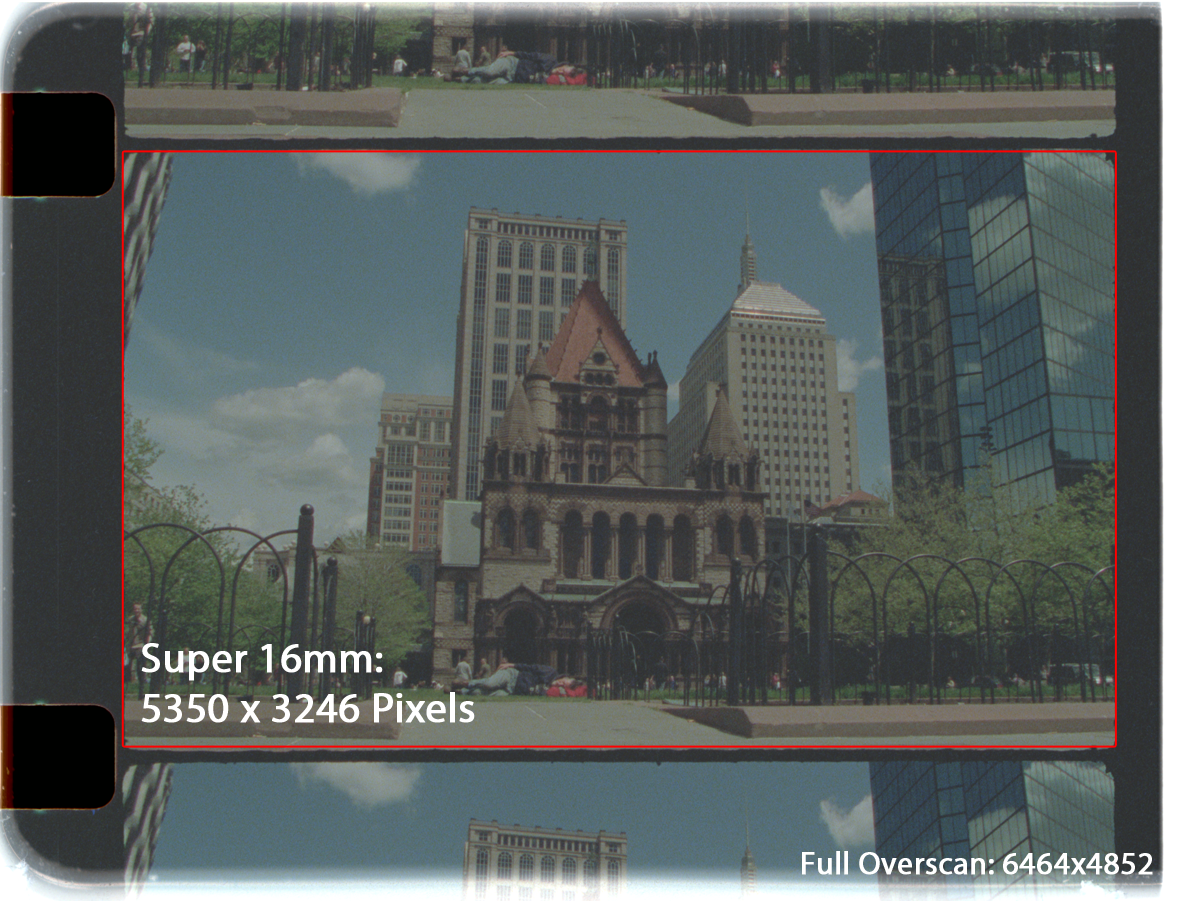
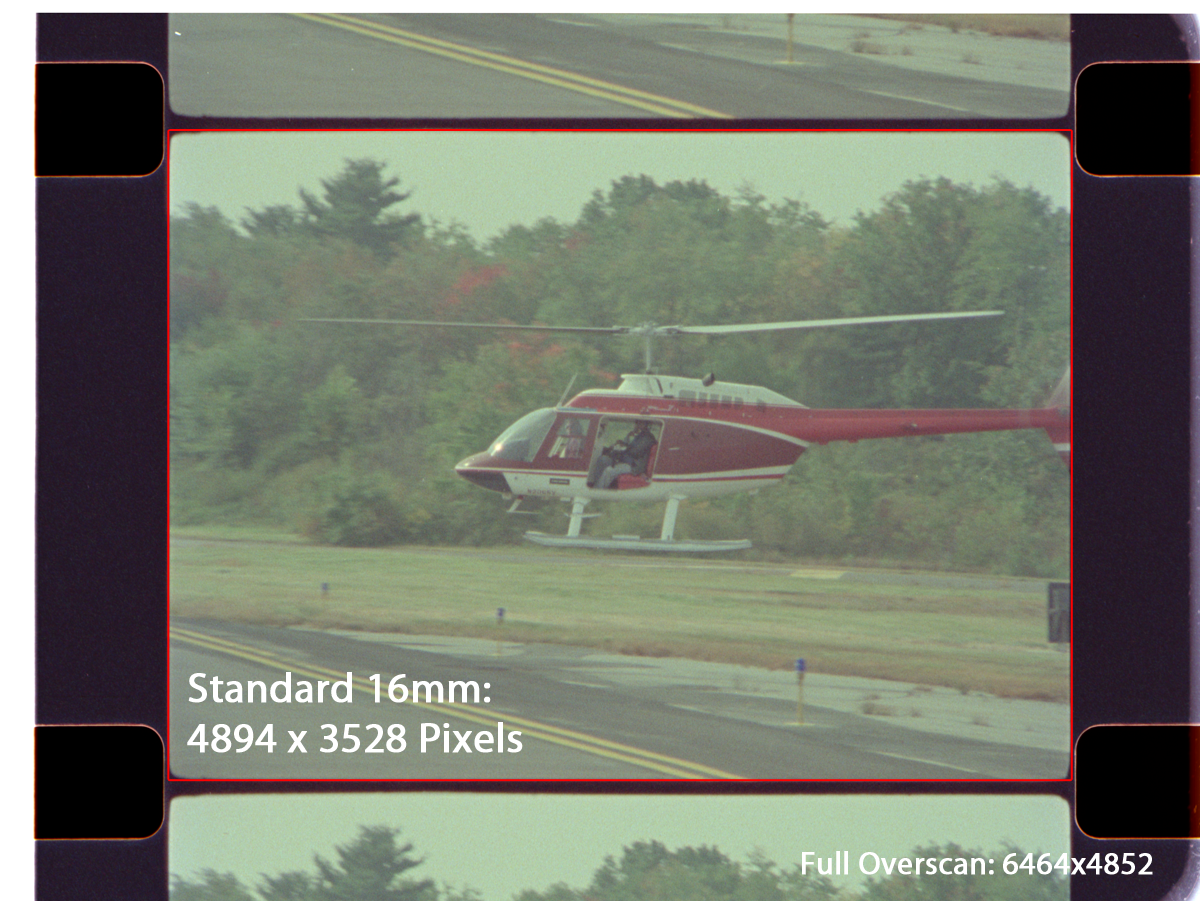
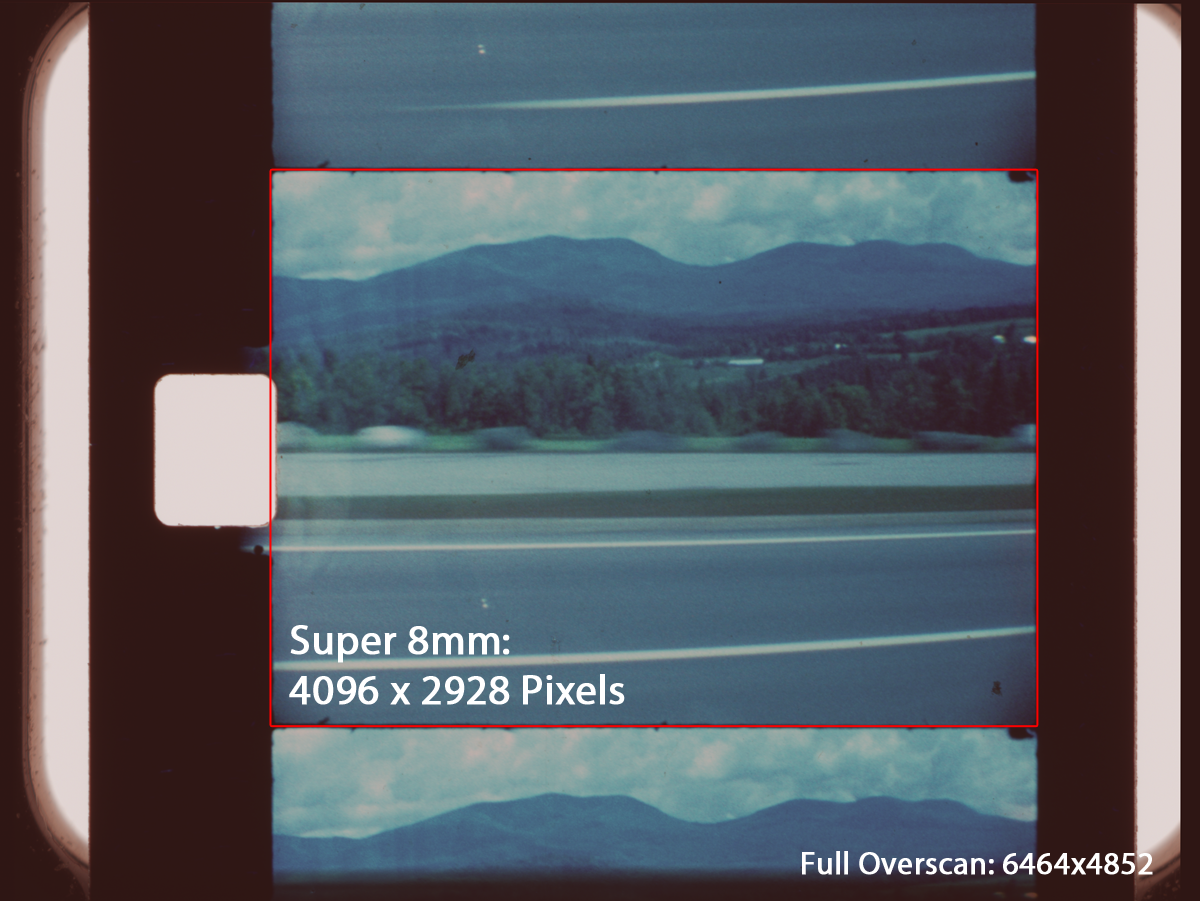
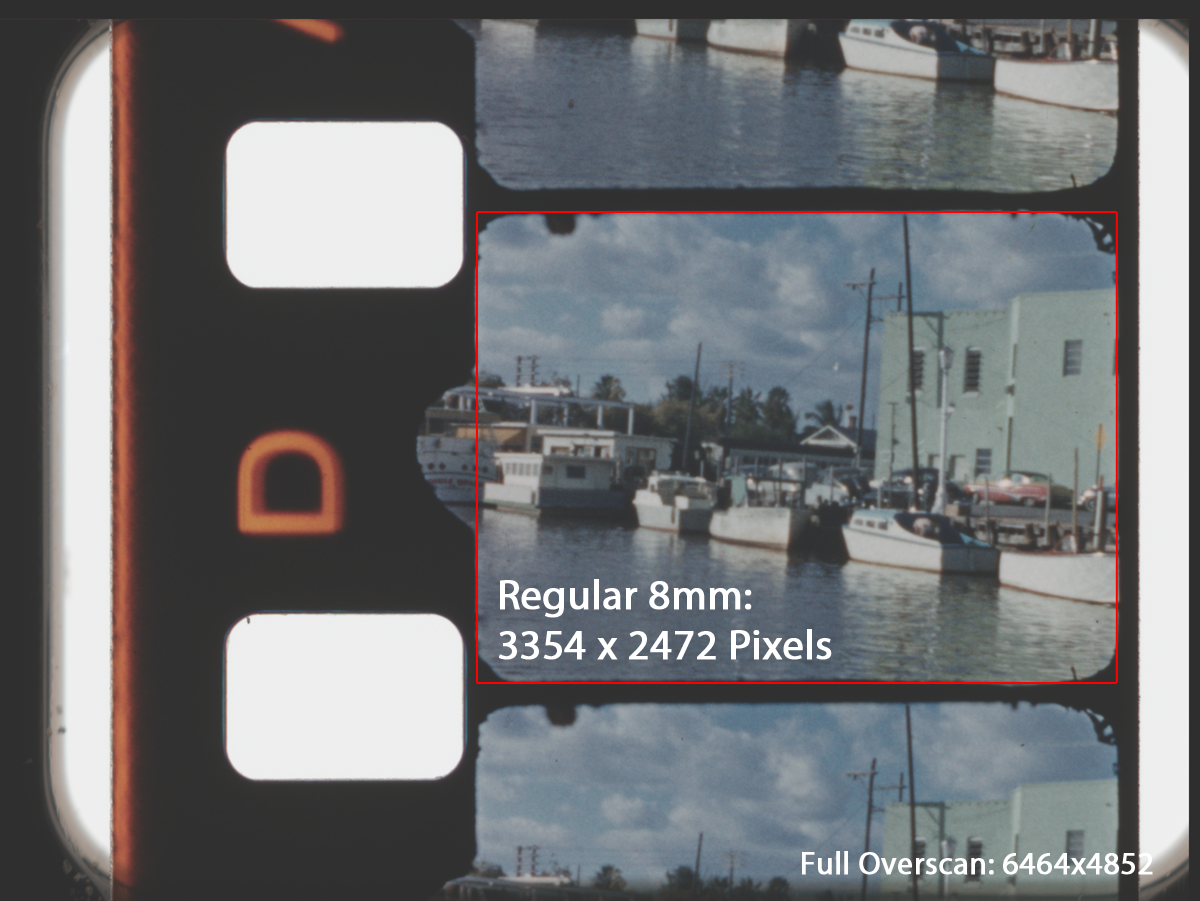
As you can see, all of the above images have the same Full Overscan dimension of 6464 x 4852. This is the resolution of the sensor in the scanner's camera. While the film frames get progressively smaller as the film gauges get smaller, it's not as extreme as it looks, since the scanner is also moving the camera and lens with each change of film gauge, to maximize the film frame's size within that full overscan area. As the film gauges get smaller, smaller variations in their position while moving through the gate are magnified, so more room is needed to allow these variations to occur without the frame ever being cropped by the scanner's gate. This is why it's not possible to do a 5.3k scan of the film frame in Regular 8mm but it is in 35mm.
What this means is that you are not getting a 6.5k image of the film frame itself, you're getting a 6.5k image of the scanner's sensor, inlcuding all of the stuff captured in the overscanned area. Why does this matter? It's important to know what the scanner is doing in the image processing pipeline in order to understand what you're getting. You can't get a 5k scan of a Super 8 film frame without scaling the image up, because the scanner's camera can't physically move close enough to the film to do that, and still register frames properly. And scaling up is bad, because it forces an algorithm to try to make up picture where there was none before. From an archival perspective, upscaling in the scanner this is a big no-no. You want to start with the native 1:1 pixel size of the part you really care about -- the film frame. From there you can scale up or down as you'd like, but at least you know what's happening and you're in control.
We generally recommend that you scan for the full aperture (the film gate) plus a little overscan, rather than Full Overscan (the scanner gate), unless you specifically want to see all the film for aesthetic reasons.
By the way, the numbers above are specific to the Lasergraphics ScanStation with the 6.5k sensor. Different scanners will have different resolutions depending on the cameras used as well as the optical system employed. The BlackMagic Cintel, for instance (at least as of this writing) does not move the camera with a gauge change, so 16mm uses a small fraction of the scanner's sensor area, where 35mm uses most of it. The ScanStation and our Sasquatch 70mm scanner are different in that they physically move both camera and lens to maximize the digital sensor's area for the highest possible resolution when changing film gauges.
Hopefully this helps to clear up some of the confusion surrounding file resolutions and the resolution of the actual frame. Let us know if you have any questions and feel free to Contact us for a quote any time!